
Inglenook fireplaces have massively grown in popularity over the last few years. Whilst traditional, they’re a more modern option for living rooms and they’re a great way to battle rising hear costs.
Whether you have an old cottage or a new build, it’s certainly possible to create your very own Inglenook and then get a stove installed. I love them in modern, traditional and rustic inspired living spaces.
We’ve recently excavated our own inglenook in our home renovation, so we can show you step by step instructions on how you can do it to, and what regulations you need to abide by, along with how to pick the right type of stove and mantle.
How To Create An Inglenook Fireplace
Find A Chimney Breast
Once you make that decision to create an Inglenook fireplace there’s no easy way to go about it as it involves knocking into your chimney breast wall.
You will need a chimney breast, existing fireplace in situ to understand whether it will firstly be possible for you to have an inglenook fireplace setup. If you aren’t sure, always consult a fireplace expert.
You can see below what we had to tackle when we moved in, it was an old coal burner and a type of fuel which is likely to be fully banned in the UK in the coming years. We didn’t want to leave a non working fireplace, so converting it to an inglenook with log burner was the best solution for us.

Remove The Existing Fireplace
The first step if you haven’t already done so is to remove the existing fireplace. Once you do so, you’ll have something that looks a little bit like this.
This was after we removed the cast iron fireplace, tiles and mantle. After it’s been removed you’ll be able to see how much you’ll need to open the fireplace up by.


Opening Up The Fireplace
An inglenook is always typically much larger than the stove you want to place inside it. The aim here is to create a recessed wall with enough space for a stove, and space either side of it too. You should mark out on the wall the centre point, and how much bigger the hole needs to be become.
There are regulations as to how much clearance is needed either side of the stove, there should be a clearance of 150mm on either side of the stove and 225mm in front. This will give you guidance on how much you need to widen your fireplace by.
You need to widen the entrance by removing the brickwork and adding a lintel if necessary to provide structural support. This can cause structural issues if not done correctly, so it is always worth seeking professional advice.
This can be a VERY messy job, so move your furniture or cover everything as the red dust it throws up stains.
In our case, we absolutely needed to add a lintel as you will see below. You can also see in the image we uncovered a gorgeous arch, unfortunately it was off centre so not something we could have kept, there was a still supporting lintel here but it needed much more support as it was being widened.
We used a concrete lintel which was 60kg, and you need to ensure that the lintel is at least 150mm inside of the opening created to ensure it provides the necessary support required.
Repairing The Wall Bonding & Plaster
During the above process, you will make a mess! It involves removing brickwork and in the process damaging plaster work. The next step is making good of what you’ve just done.
We had to put quite a few bricks in to close up the gap between the lintel and arch. One of the best ways to do this is to feather the new brickwork into old bricks, this involves cutting out a further section of the older bricks. The reason for doing this is because it makes the brickwork stronger. If you simply just add new bricks in, rather than tying into the old bricks you end up with a potential weak section.
We used a sand and cement mix to secure the brickwork into place securely. Of course, as you’ll see, all of the existing plaster has come off in the process. You can either repairing the wall in sections if you’re able to do so, but for us we will need to get this rendered with a cement and lime mix as traditional cement can crack under heat.
Some people choose to keep their brickwork in the opening exposed which is totally fine, but for us we will be getting this rendered in the same heat resistant lime mix.

Inglenook Wall
Traditional inglenooks would have had the red brick behind the stove. However, when carving your own one out of the wall the finished look is likely not going to look anything like what you may have had in mind.
You may choose to keep it rustic looking with the existing brick, but another traditional choice is to add brick slips at the back. This creates a gorgeous, rustic and farmhouse style look.
If you choose to paint it, make sure you choose a heat resistant paint such as Vitcas, it’s best to stick to darker colours such as black if you are wanting to paint the walls surrounding the stove.
All types of ceramic tiles are generally fine to use as they are heat resistant, but make sure that a fire proof adhesive and grout is always used.
Picking The Right Stove
Choosing the right type of stove will include the size of the room, the size of your opening and also what style you like. Again, this is why I really recommend getting a professional in to install the stove, even if you excavate the inglenook like we did. This is something you don’t want to get wrong.
The specialist will measure the area and advise what sort of size you can get. The next thing they’ll discuss with you is the heat output and whether you want a purely wood burning stove or a multi fuel option.
The Heatas professional said to us that it’s best not to go for anything higher than a 5KW output because anything over this and you need to install a permanent air vent in the room. 5KW and under and simply just having your door open during use is enough for ventilation. You can also get fans added to the top of your stove, but it’s not a regulation that you need to have them.

Install The Stove
You do need to lay a hearth with a stove, the hearth should be at least 12mm higher than the floor, and as mentioned before, extend at least 150mm either side of the stove. Again, use heat resistant adhesive and grout when laying the tiles.
Once fitted, you’re ready to install your stove! You’ll need a qualified fireplace specialist to help fit this successfully, and to ensure there are no blockages in your chimney. If your fireplace hasn’t been in action for a while, this is an absolute necessity. There are so many regulations when it comes to installing a stove and you generally need a HEATAS approved installer, this will give you the necessary paperwork required if you were to sell the property too.
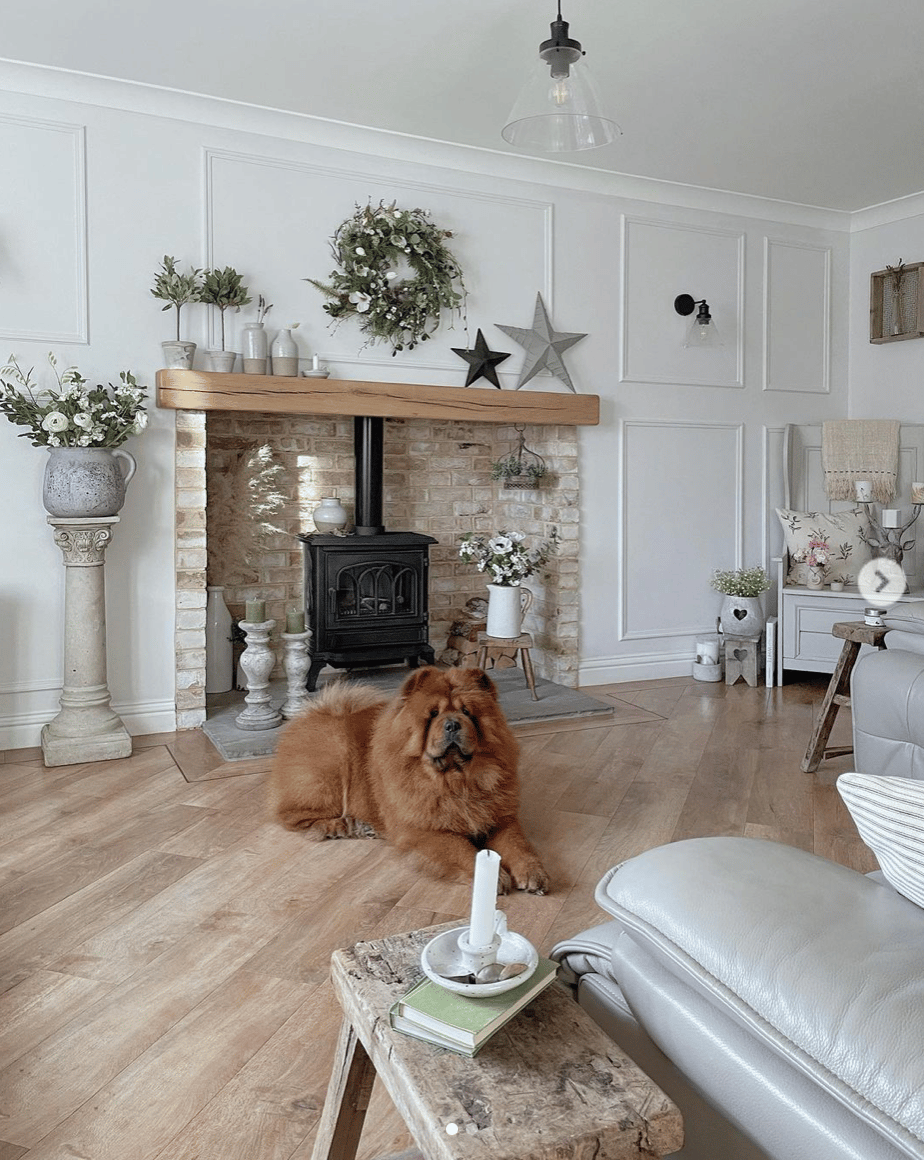
Here is an inglenook I absolutely adore from Nicki’s beautiful home. I love her inglenook fireplace surround which has been finished with brick slip, a stone hearth and beautiful decorative finishes for a rustic, farmhouse style focal point in her living room.
Just a reminder, that storing decorative accessories next to your stove is fine if it’s not being used, but wood is a combustible and there should always be a 150mm clearance on either side of the stove. If your opening is bigger than you have the option to store some if you want to.
Picking The Right Beam or Mantle
If you like the modern look, you don’t need a beam or mantle to complete the look. Beams are one of the most popular options above an opening like this, giving you a place to add decorative features, but so many people pick the wrong type.
Firstly, if you want to use a traditional wooden beam it needs to be 450mm from the top of the stove. As you can imagine, this can end up looking silly, despite it being safe! You may be able to position it closer to the opening if your stove is set back much further. You must seek the advice relevant to your own opening to be sure though, but 450mm from the top of the stove is standard regulations, as you can’t have anything combustible within this space.
The other alternative is to go for plastic beams which give the effect of a wooden beam. I’m personally not a fan of these as you really can tell the difference, but it’s totally personal preference and a work around for getting a beam added closer to your opening.
If you want a more traditional mantle to frame the opening which is what we are opting for, wooden surrounds are totally off the cards, but marble is absolutely fine. Of course, the downside is that marble is the most expensive type of mantle to get, so do keep an eye out on Facebook marketplace, eBay and second hand stores to try and get one at a reduced cost.

There you have it, your very own gorgeous Inglenook fireplace. I absolutely love the traditional look they bring to an interior, they particularly look the part in modern farmhouse style interiors. Are you a fan of an inglenook fireplace?If you have any questions about our process, please leave me a comment below and I’ll come straight back.
*This information is purely from personal experience and is not an expert opinion, although information here has been used from the Heatas approved installer we used. Always consult a professional when altering a structural part to your property.