I’ve said it before, but removing an original Victorian fireplace and boarding it up is a crime against interiors. Why do it?
When we bought our Victorian house, a fireplace renovation was one of the first things on our hit list.
We were met with the ugliest marble effect plastic cover which was stuck over the top of where the fireplace hole was, and finished off with a thin, grey (much like the rest of the architraves and skirting) surround. Ugly.
Reinstating as many Victorian details as possible was really key in the design process, I wanted to use the architectural parameters to add something old, yet unique to the property. The fireplace for me is the focal point of a living room with a chimney breast, there’s just something cosy, beautiful and centring to it.
The problem? Fireplaces brand new are EXPENSIVE, like at least £500+, and whilst some replicas can look great, they often don’t have the same characterful definitions to them.
From start to finish, here is how we reinstated a classic Victorian fireplace for just under £100!
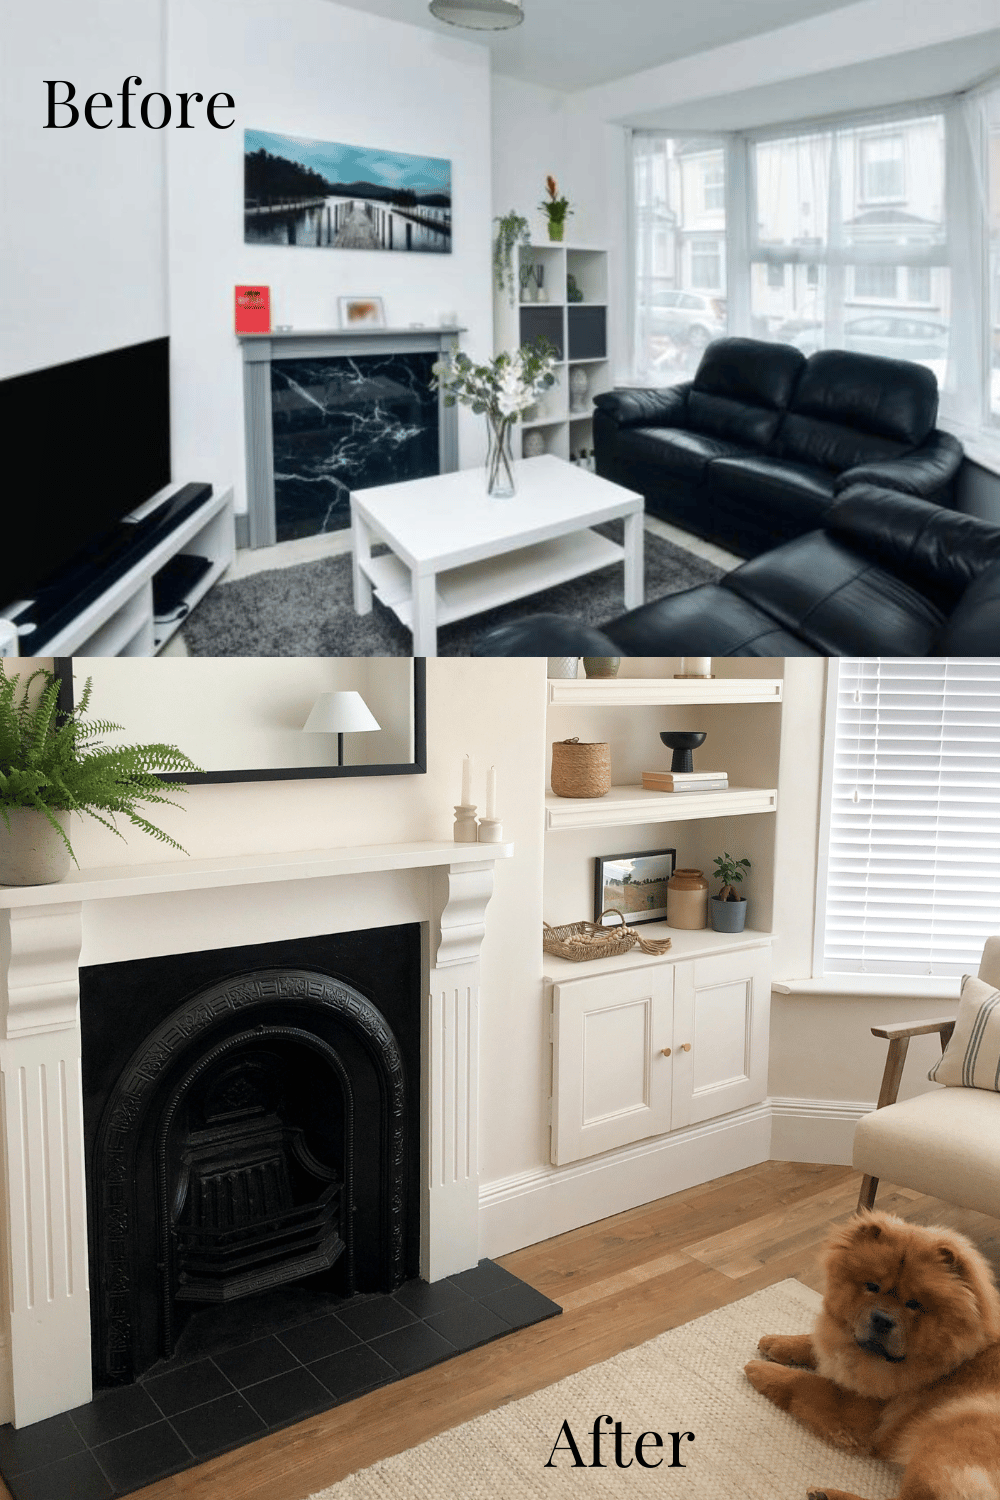
The Before – The Starting Point
The existing hole of where the fireplace was had been boarded up with a marble effect plastic cover with a grey surround addition on top, as pictured. It’s fair to say, this definitely wasn’t what the Victorians were digging. Nor, the sticky leather sofas.

Removing this was one of the first things to do. The surround was pretty easy to extract with putting a crow bar beneath it, and the plastic cover was literally attached with masking tape. Nicely done.
This revealed the below. There was already a hole where a fireplace would have once stood, luckily there was also a lintel already in place which meant we would be able to do the work ourselves (more about lintels later on).

Facebook Marketplace – Sourcing An Original Cast Iron Fireplace
This hole was exposed for some weeks. I’d seen a number of people sourcing a cast iron fireplace on Facebook marketplace for a really affordable price and it was my first port of call.
I had to wait a while, but it was worth the wait. You can set reminders for specific keywords to see what new items have been added. Fireplaces are quite sought after, and believe it not, people are still removing these from their houses.
It must have been weeks, but finally the perfect fireplace came up. It was a Georgian cast iron fireplace with a pine surround. It needed a bit of work, but it only set us back £50, such a bargain! This has probably been one of my favourite marketplace purchases to date.
Please note that as we were doing this on a budget, we were not installing it to become a working fireplace, the was purely for aesthetic looks and reinstating the Victorian authenticity to the property.

Fireplace Restoration
The next part of the fireplace renovation was giving the cast iron fireplace a bit of love. The night before we started, we left the fireplace outside as it stank! In the the night there was a huge gust of wind which resulted in the fireplace completely toppling over and the brick part inside cracking in half. I was absolutely devastated.
Luckily, it was fixable. Phew.
Initially we had to clean the fireplace, including all of the fireplace accessories. I did this with a bucket of soapy fairy liquid water and a sponge, as well as using a wire brush to really get to that dirt and rust. It was very rusted so we had to do the best job we could to remove the flaky pieces of rust.
Once this was dry it was time to spray it. We used Hammerite smooth black metal spray paint, we used one can of this and did two coats. We sprayed the entire thing, along with the decor accessories.
I joke that the house is made up of no more nails and filler, but seriously is there anything no more nails can’t do? We used some of this to glue the broken brick back together, once this had set, we sprayed this section too. You couldn’t see any cracks anymore, we just had the challenge of cementing it into place once the fireplace was fitted.
With that drying, we took to the surround. I understand and appreciate the beauty of pine, but it’s not for me and does not suit my decor scheme.
Because of this, we cleaned, sanded back and then painted it in a white satin paint to match that of the skirting boards.
Excavating The Hole & Creating The Hearth
The latter wasn’t as nice a job, this is when things got messy! The existing hole was clearly not large enough to take the new fireplace which would involve excavating some of the brickwork.
As there was already a lintel existing within the wall, we were not required to install a new one, but you should always install one if there is not one existing and you plan to do it yourselves so as not to impact the structural integrity of the wall. If you’re not sure, always seek advice from a professional.

To work out how big the hole had to be enlarged by we put the fireplace up to the wall and marked out the area to cut, as well as the centre marking which we would use when it came to fitting it into the wall so it was positioned correctly, and to the centre of the chimney breast.
With the markings set, it was time to cut into the wall. This was done with tools we already had which were a grinder which we used to cut the hole, and a hammer and bolster to knock the bricks out.
This is messy work. We were cutting into brick so there was a layer or red dust everywhere in the living room! Try and seal off the door if you can and cover, or move all of your furniture. Trust me on this one. We had to repaint the entire room a third time after this. Rookie mistake!
Once the hole had been cut to size and checked, we firstly needed to install a tiled hearth so the fireplace and surround could fit on top of this. It’s really important that this part is done first.
Choosing tiles for the hearth was one of the things I struggled with the most. I hadn’t had to do anything like this before and I was just really unsure what would look good.
Eventually, I decided on Matt Black hearth tiles that would be fitted to 12 inches out from the wall. This was the closest colour match we could get to the fireplace, and it actually turned out really well.
You can go for a quirky twist by adding more traditional style tiles, but it’s just what suits your personal taste. As we don’t intend to stay in this house too long we just wanted to get something that would appeal to others, but also look good too. As we’ve opted for a modern style living room, the black accents just work.
We marked out the area for the tiles, applied tile adhesive and fitted the tiles. Once this was dry, we grouted with black grout. The tiles came to just over £30.
Fitting The Fireplace
Once the hearth had been left to dry, it was time for the moment of truth, fitting the beautiful fireplace into place. After the hearth had set we inserted the fireplace into the hole and secured this to the wall with plugs and screws, ensuring it was to the centre of the wall and level (remember the markings from earlier).
We then used a ready mix cement for the lower area and for adding the brick back into place, luckily we already had some leftover from a bag we had used in the hallway. Once this had set, we sprayed the cement in the same smooth black paint spray so it all looked seamless, and like it had always been there.
The surround was then fitted into place and secured with screws, ensuring it was level, and we then used caulk to seal any exposed edges, as pictured below this was just after the surround had been fitted, and just prior to caulk being used to finish it off.

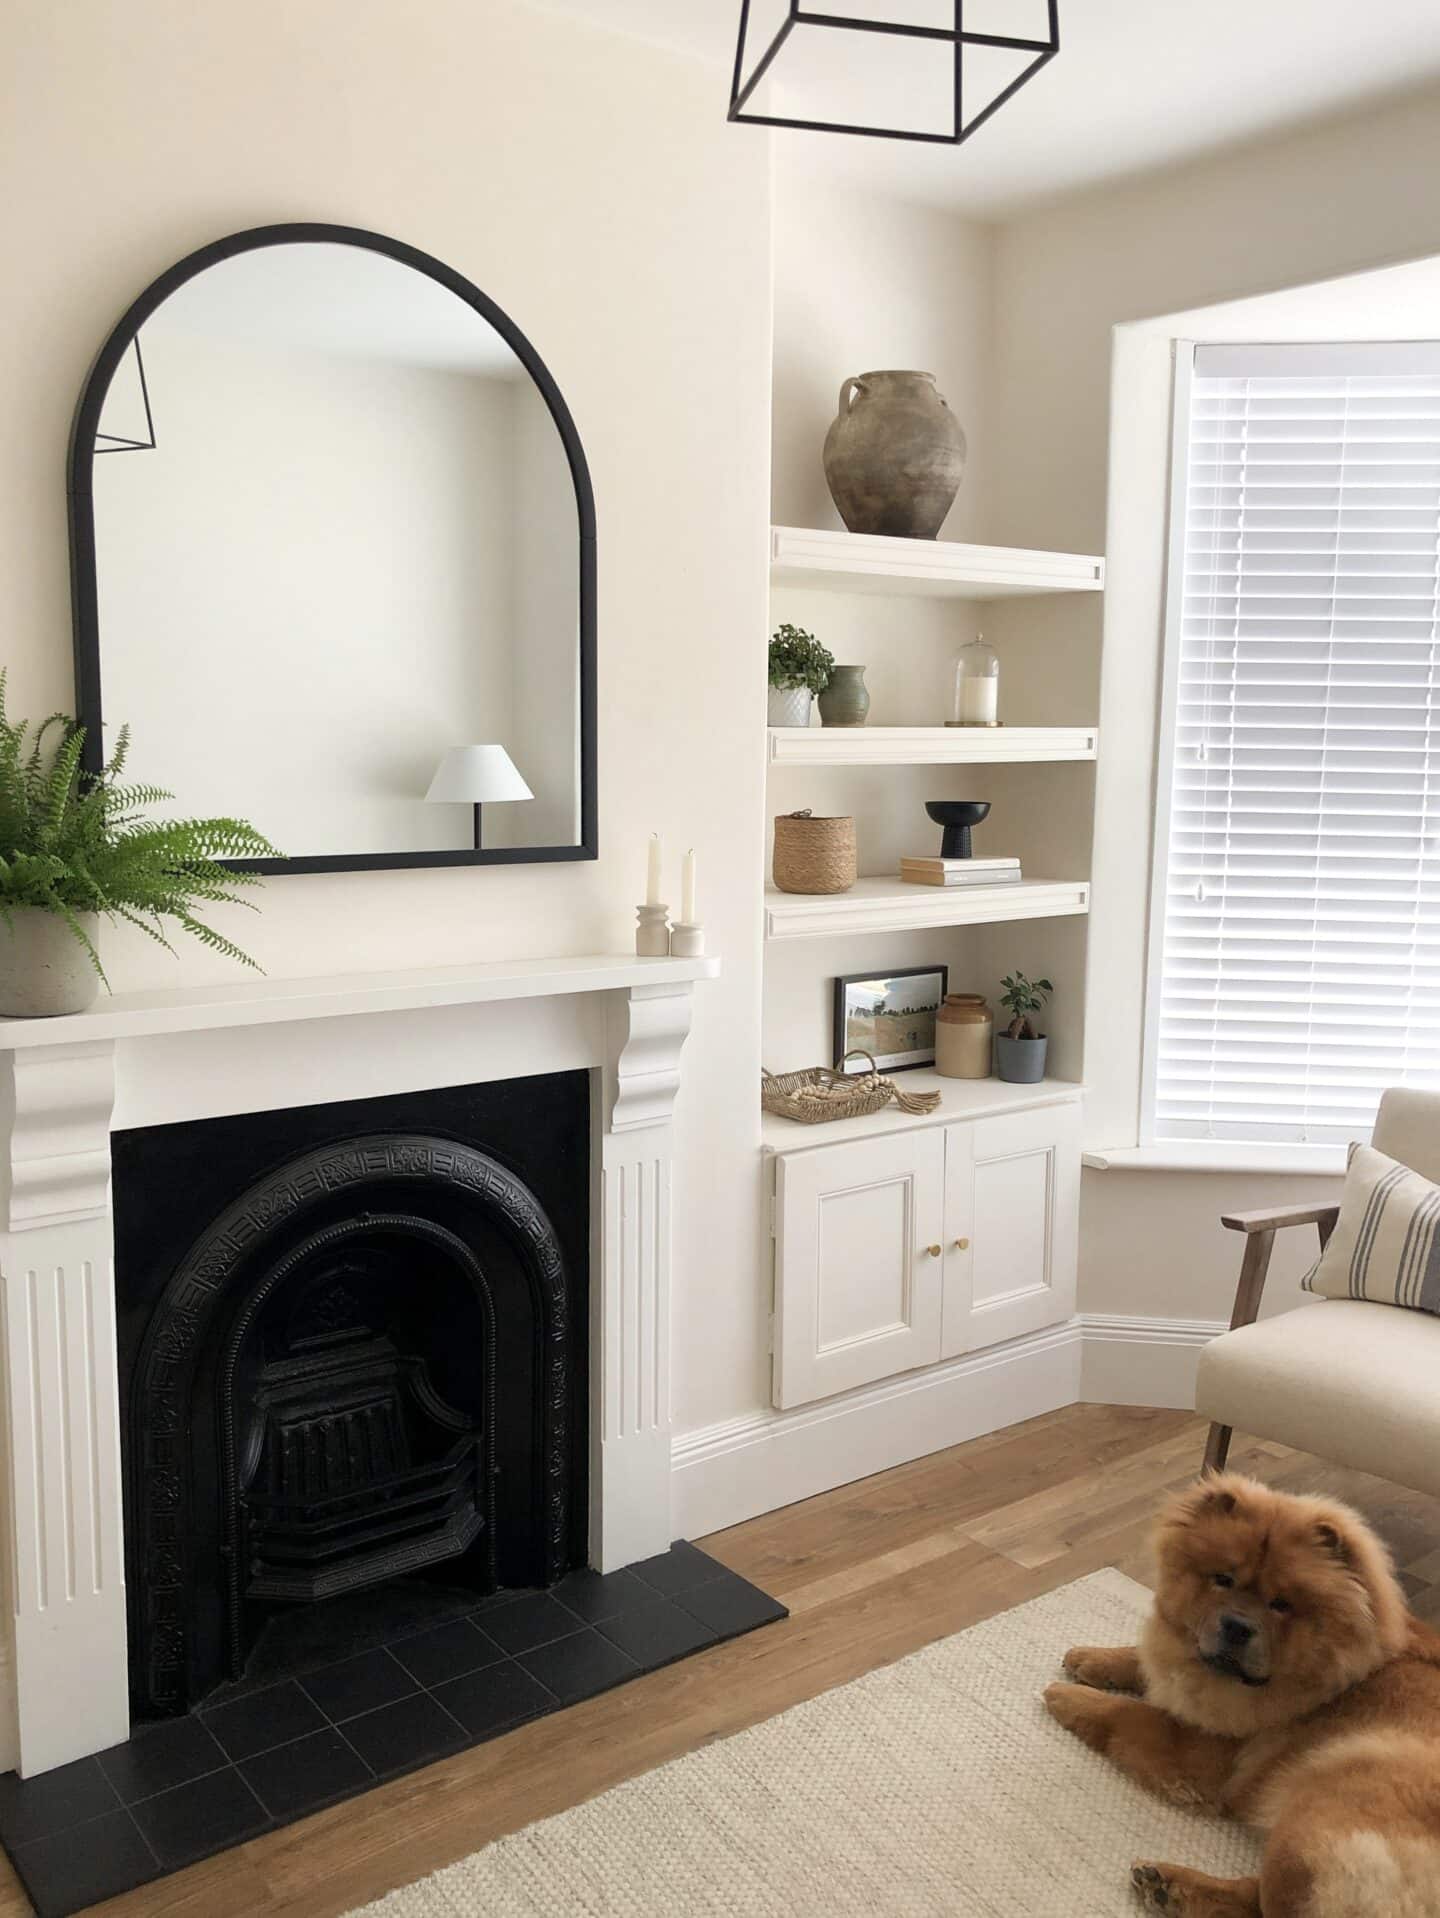
The After – Victorian Fireplace Renovation
I couldn’t leave you with the above image of the fireplace renovation and the rest of the room not being finished. You need to appreciate this living room transformation in its full entirety.
I LOVE it. This has been one of my favourite transformations (aside from the bathroom and terrace garden). I’ll be posting a full reveal on everything we did in this room and full photos once we have finished getting the last few styling bits.


From damp, mouldy and uninviting, we have created a cosy, welcoming and light space that I now love to sit and relax in. As I said, I’ll share the full living room transformation in another post, as the fireplace renovation is very much the star of the show here!
In Summary
These are the total costs of the fireplace renovation so you can see them all in one place;
- Cast iron fireplace & surround from Facebook Marketplace – £50
- 17 x black quarry fireplace tiles 146mm x 146mm – £31.80
- Hammerite Smooth Black spray – £15
- Ready mix cement (already had this leftover)
- Black grout (already had this leftover)
- Tile adhesive, caulk, white satin paint – already had these from the rest of the renovation to hand
Total costs = £96.80
Please note that as we were doing this on a budget, we were not installing it to become a working fireplace, the was purely for aesthetic looks and reinstating the Victorian authenticity to the property. We were able to do this so affordably because we weren’t intending on it being a working fireplace. If you want a working fireplace, always consult a professional.
We are over the moon with the this fireplace renovation and the new focal point in our living room. I cannot wait to see this fireplace mantel change seasonally as we dress it.
We finished it off with an arched mirror above it to add some curves to the interior, whilst it helps to reflect light around the room. It has a black accent around it to tie in with the modern decor scheme, whilst it also helps to enlarge the room.
For just under £100 we have added value to the property with this fireplace renovation, whilst it looks amazing too. In looking for a bargain on Facebook marketplace and spending a bit of time restoring it, we saved ourselves £100s of pounds which we could use on other areas of the renovation. We love it! What do you think? Have you done something similar?
Beautiful job at a bargain price, well done !
Thank you!